These days it’s genuinely hard to find someone who isn’t using agents to write code — and agents for development are great. The problem of writing low-level code is, for all practical purposes, solved. Take a single method in a vacuum: the agent’s version will almost certainly beat what a human would have written, both in efficiency and in clarity. Assuming, of course, we’re talking about modern, genuinely strong models.
But now we have different problems: managing context, managing the agent, managing our own intent, managing the architecture of the project.
All of that used to live in the developer’s head. When we ran into code we didn’t understand in the moment, we’d either check git blame or walk over to a colleague: “Dave, do me a favor and explain what the hell is going on here — I can’t work out why it was done this way.” And Dave, the expert on that subsystem, would happily answer: “There’s a null check there because that API returns something slightly off under that condition — some nonsense like that.” Knowledge lived in developers’ heads, and when you’ve been writing the same subsystem for five years straight, that’s mostly fine.
Then agents showed up — and they write code ridiculously fast. The speed is incredible. Some developers claim they’re landing 100 commits a day. Sure, we believe you. But the question becomes: who is going to make sense of all that code later? This is exactly where the human becomes the bottleneck. And there are two bottlenecks at once:
- Verifying that the code that got written is actually the code we wanted.
- Holding in your head the context behind specific decisions: why the functionality was built this way and not another.
Code used to essentially be the documentation, and whatever was written in the code could be called the source of truth. That’s no longer quite the case — because a human physically cannot review all the code an agent produces. Sure, you could turn a person into a reviewer who does this eight hours a day, but I’d love to meet whoever survives that.
I’m afraid that person walks out a window fairly quickly. Now, someone might say: if agents write for us, we don’t need to store any information at all — the agent will just read the code. But again, this isn’t code you can treat as documentation: it may well contain a mistake. Which raises the question — how do we keep that mistake from happening in the first place?
And this is where spec-driven development walks onto the stage. Code used to be the most precise specification — and broadly speaking it still is. But every line of that specification was chosen deliberately, not generated, and it was unthinkable that no human had looked at it. There was no code reaching production that at least one person who wrote it hadn’t laid eyes on. Someone might say: but the agent can write tests and check itself. Tests exist, absolutely. The trouble with tests is that they can just as easily lock in very wrong behavior (here’s a paper on exactly that). Beyond that, it’s the same question of correct context, and so on. With all of these problems, the industry is gradually converging on spec-driven development.
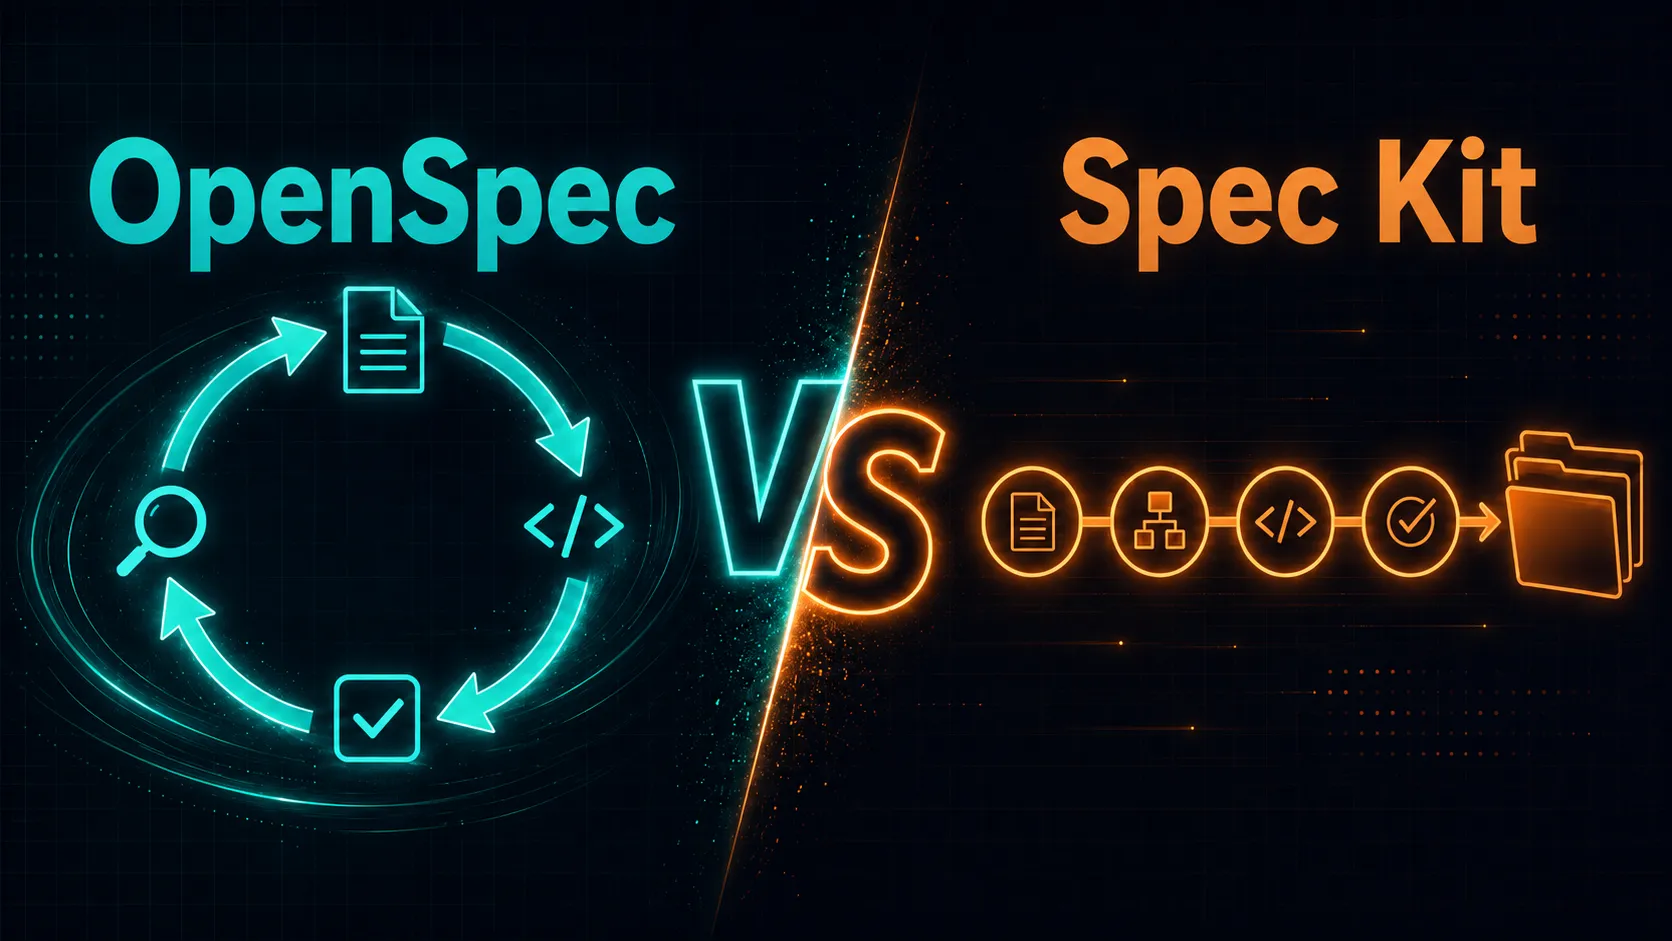
I want to walk through two major methodologies — OpenSpec and Spec Kit — and in a follow-up article I may cover others that also support working from specifications.
Both methodologies are essentially a set of skills for any AI agent, but each has its own character. I’m not trying to write exhaustive reviews of these tools, especially since they keep evolving; I want to give you a working understanding of each.
OpenSpec
Let’s start with OpenSpec. It’s built by the Fission AI team — and by and large, OpenSpec is their product: the open-source project everything revolves around.
Installation
The base CLI installs via npm: npm install -g @fission-ai/openspec@latest. From there it configures your project and your agent with openspec init. That installs a system of skills or slash commands into your agent under the opsx prefix and initializes the project structure. Broadly speaking, you end up with a single openspec directory containing a config.yaml — more on that below. For now, we can already start writing specs. You’ll likely barely touch the CLI yourself, but the OpenSpec skills will be calling into it constantly.
OpenSpec propose
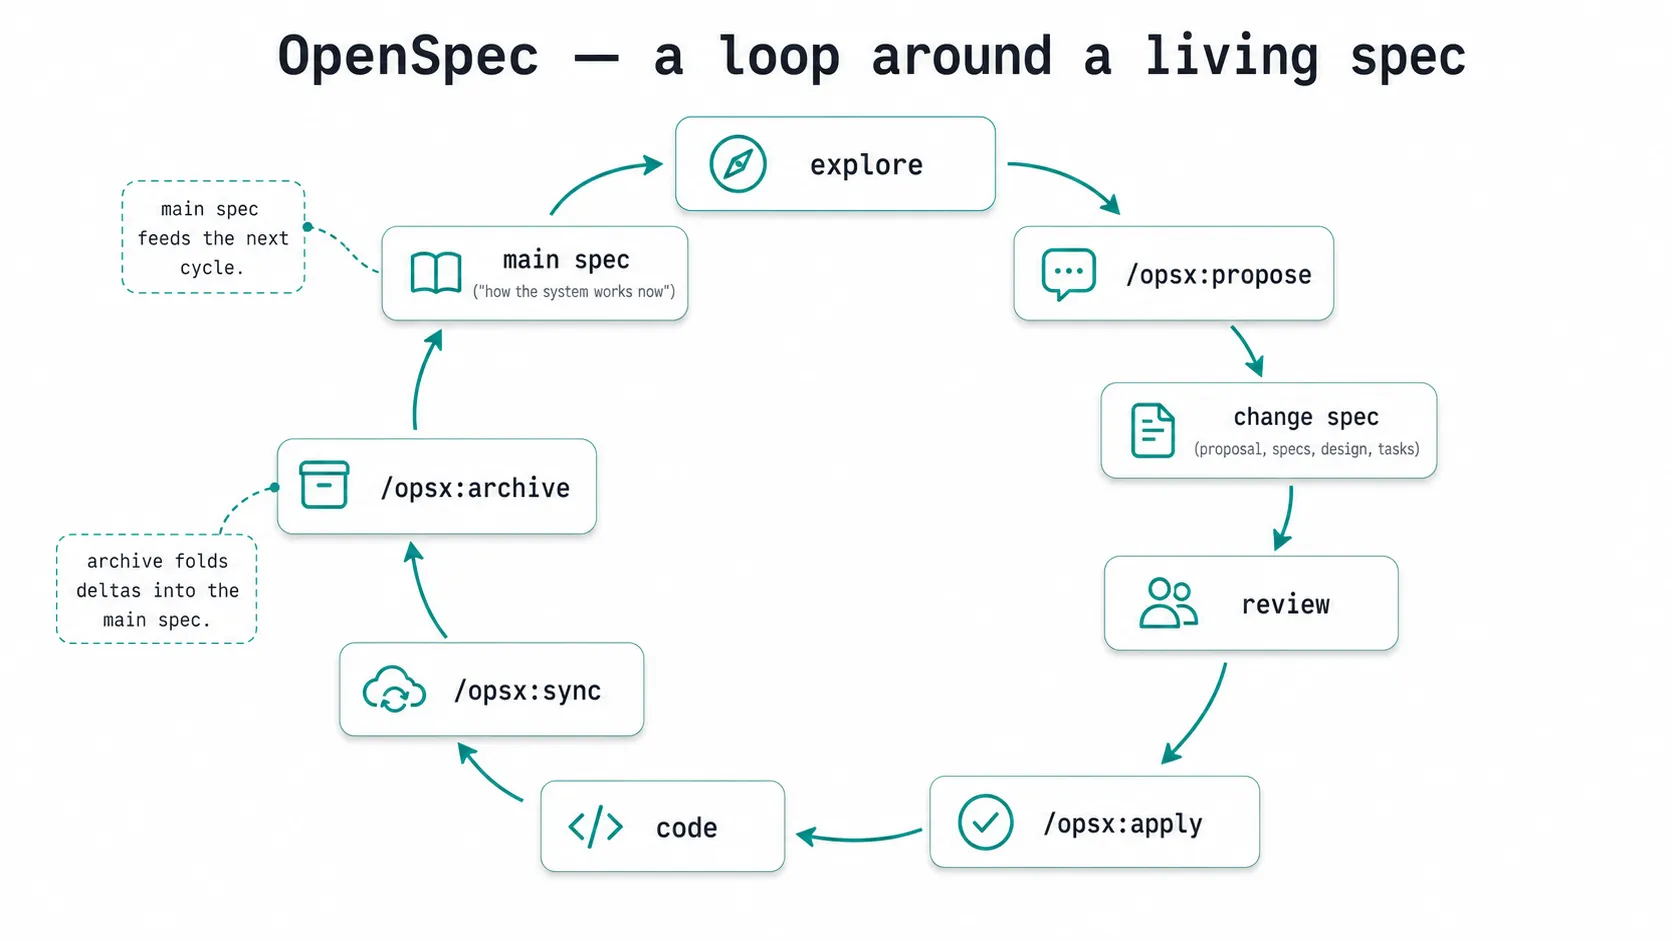
The first command, the one that kicks off the standard workflow, is /opsx:propose. You type it to your agent along with a description of the task you want done. OpenSpec then creates a new change specification.
SpecBuddy supports OpenSpec. Personally, I hate typing in a terminal. SpecBuddy gives you a comfortable editor where you can describe the initial request.
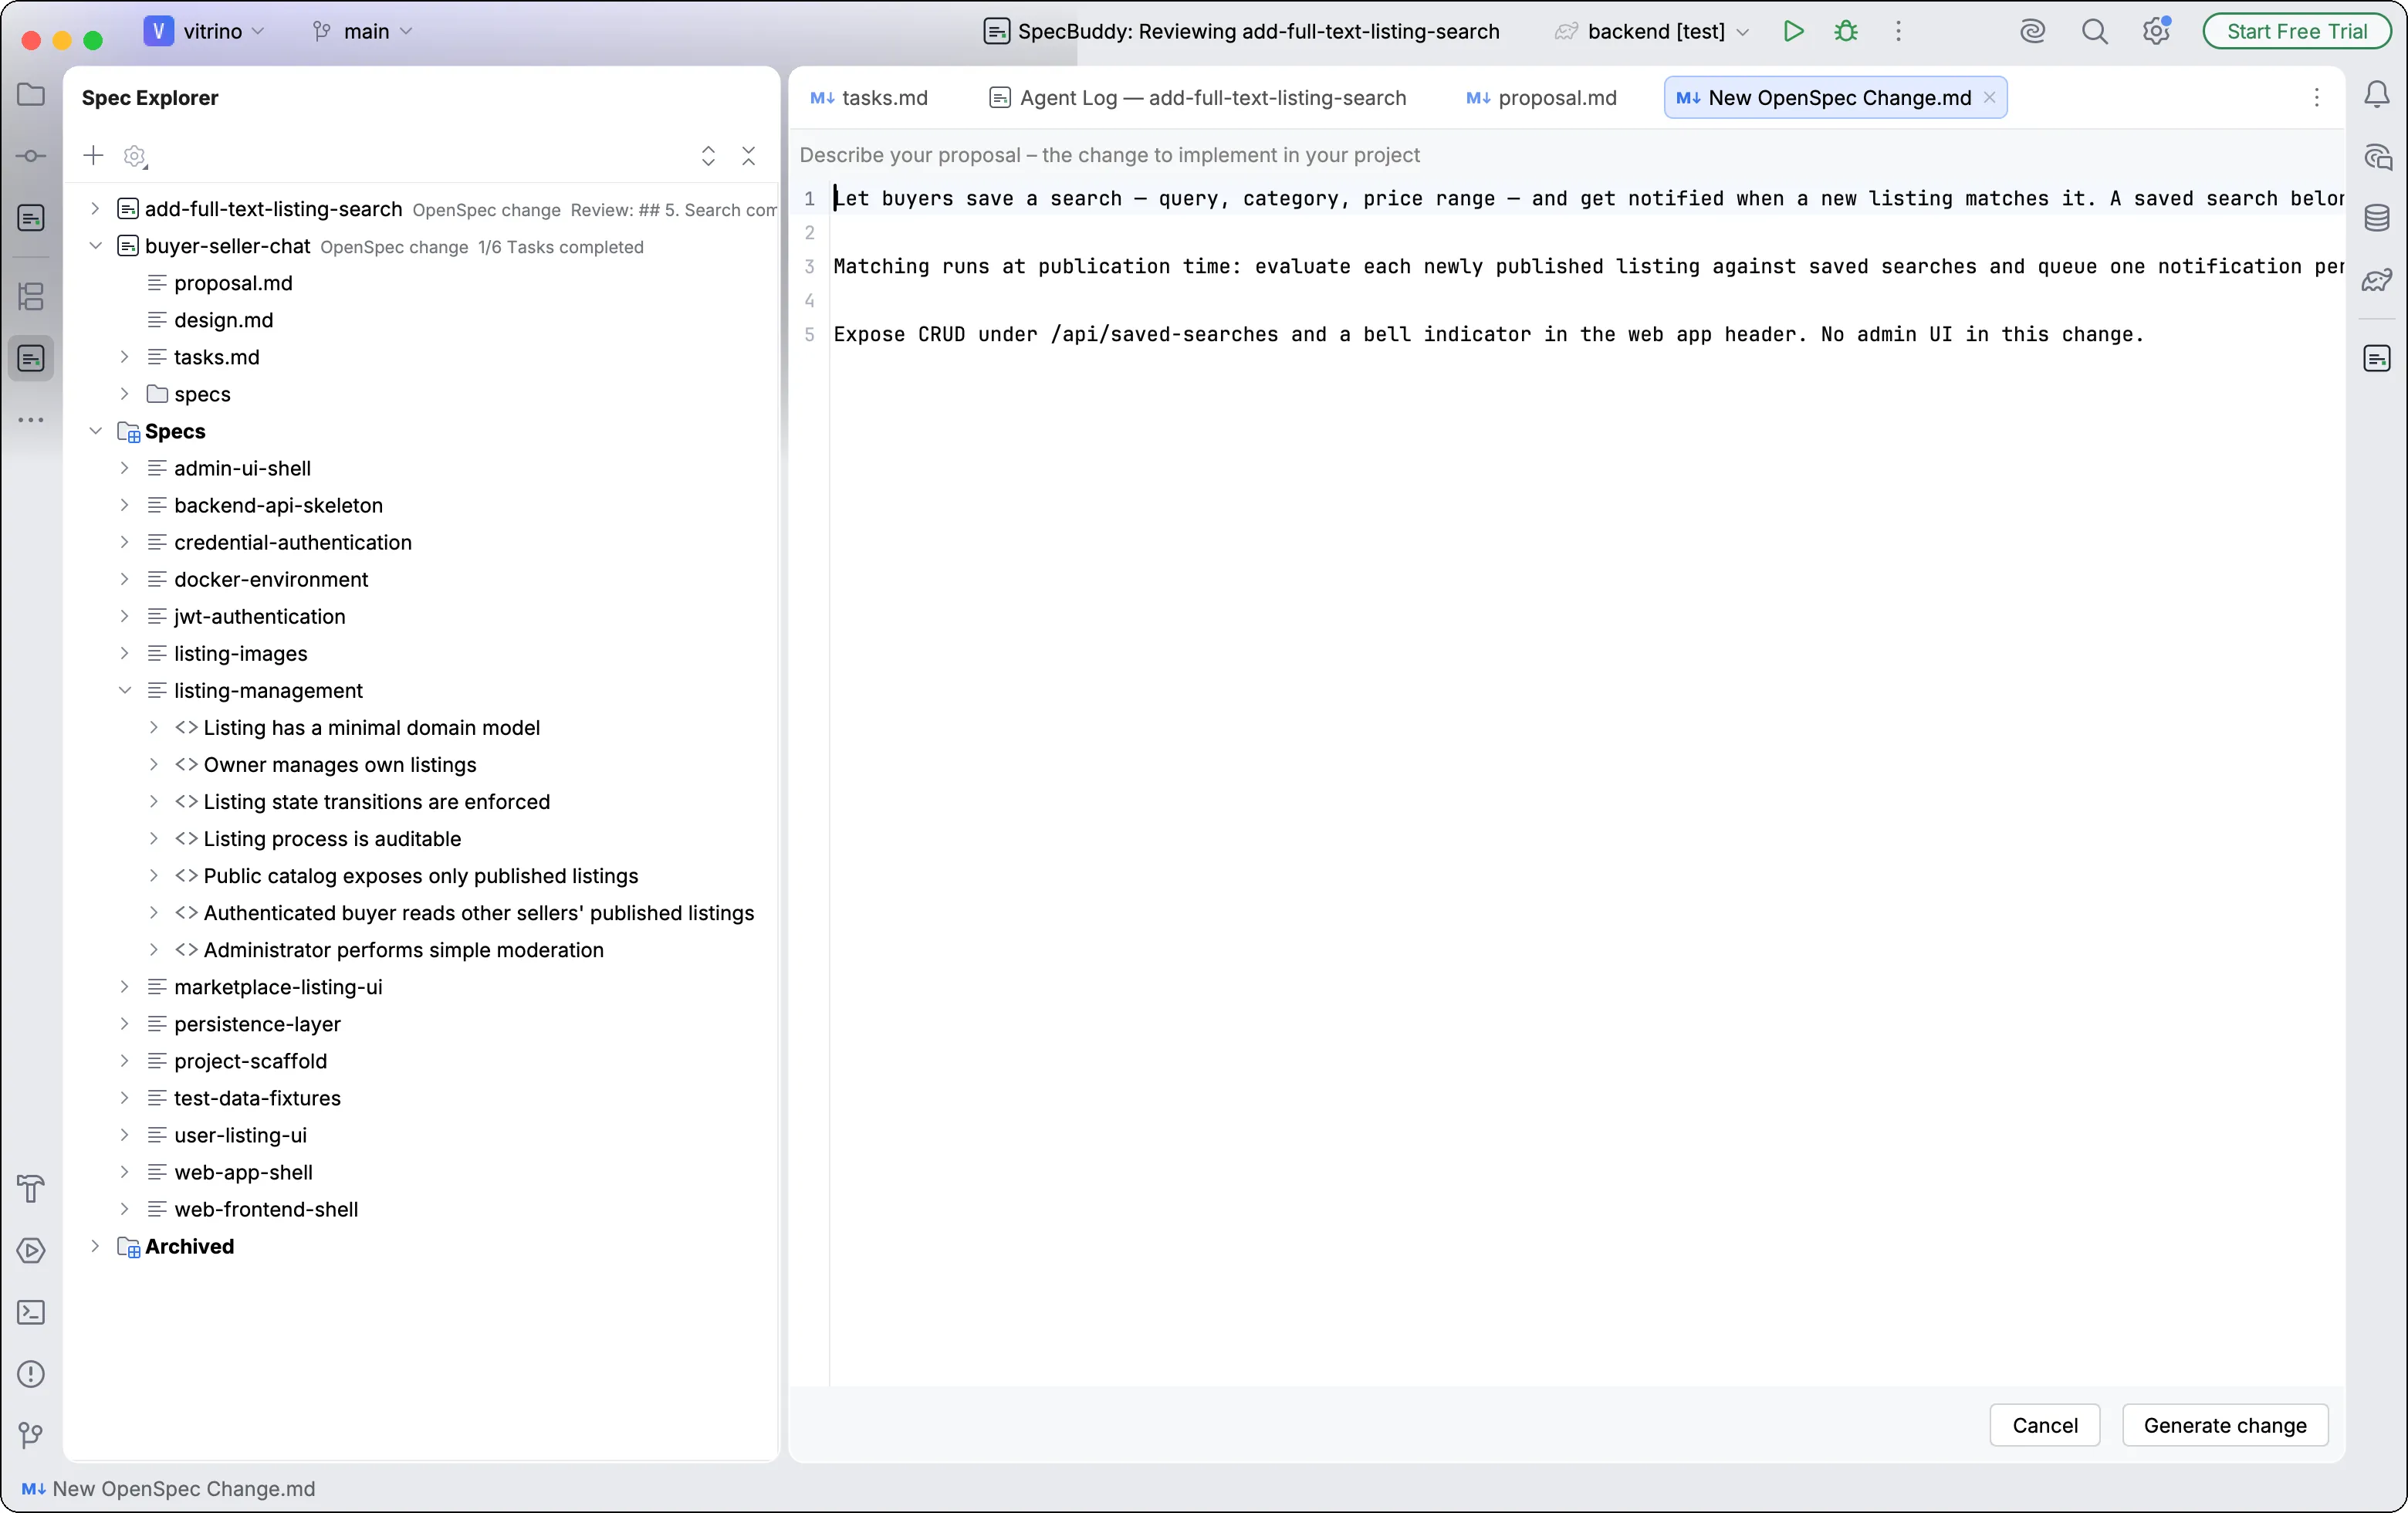
After generation you get a directory openspec/changes/<change-name> and a set of artifacts: the proposal itself, the technical design, and requirements in Gherkin form (GIVEN/WHEN/THEN).
Worth noting here: OpenSpec has two kinds of specifications — change and main. Main specs describe the project’s current behavior: what works and how, right now. A change spec describes creating new functionality or modifying existing behavior — whatever we’re working on at the moment.
Of course, a change spec existing doesn’t mean it’s any good. The agent may have generated nonsense, misread our requirements, left contradictions in place, and so on. The assumption is that after the proposal is created we keep working on it, bringing it up to standard. I personally use SpecBuddy and its review mechanism for this. It would be a shame to get the wrong result simply because you “grabbed the spec and applied it,” trusting the agent’s first (second, tenth) judgment.
OpenSpec apply
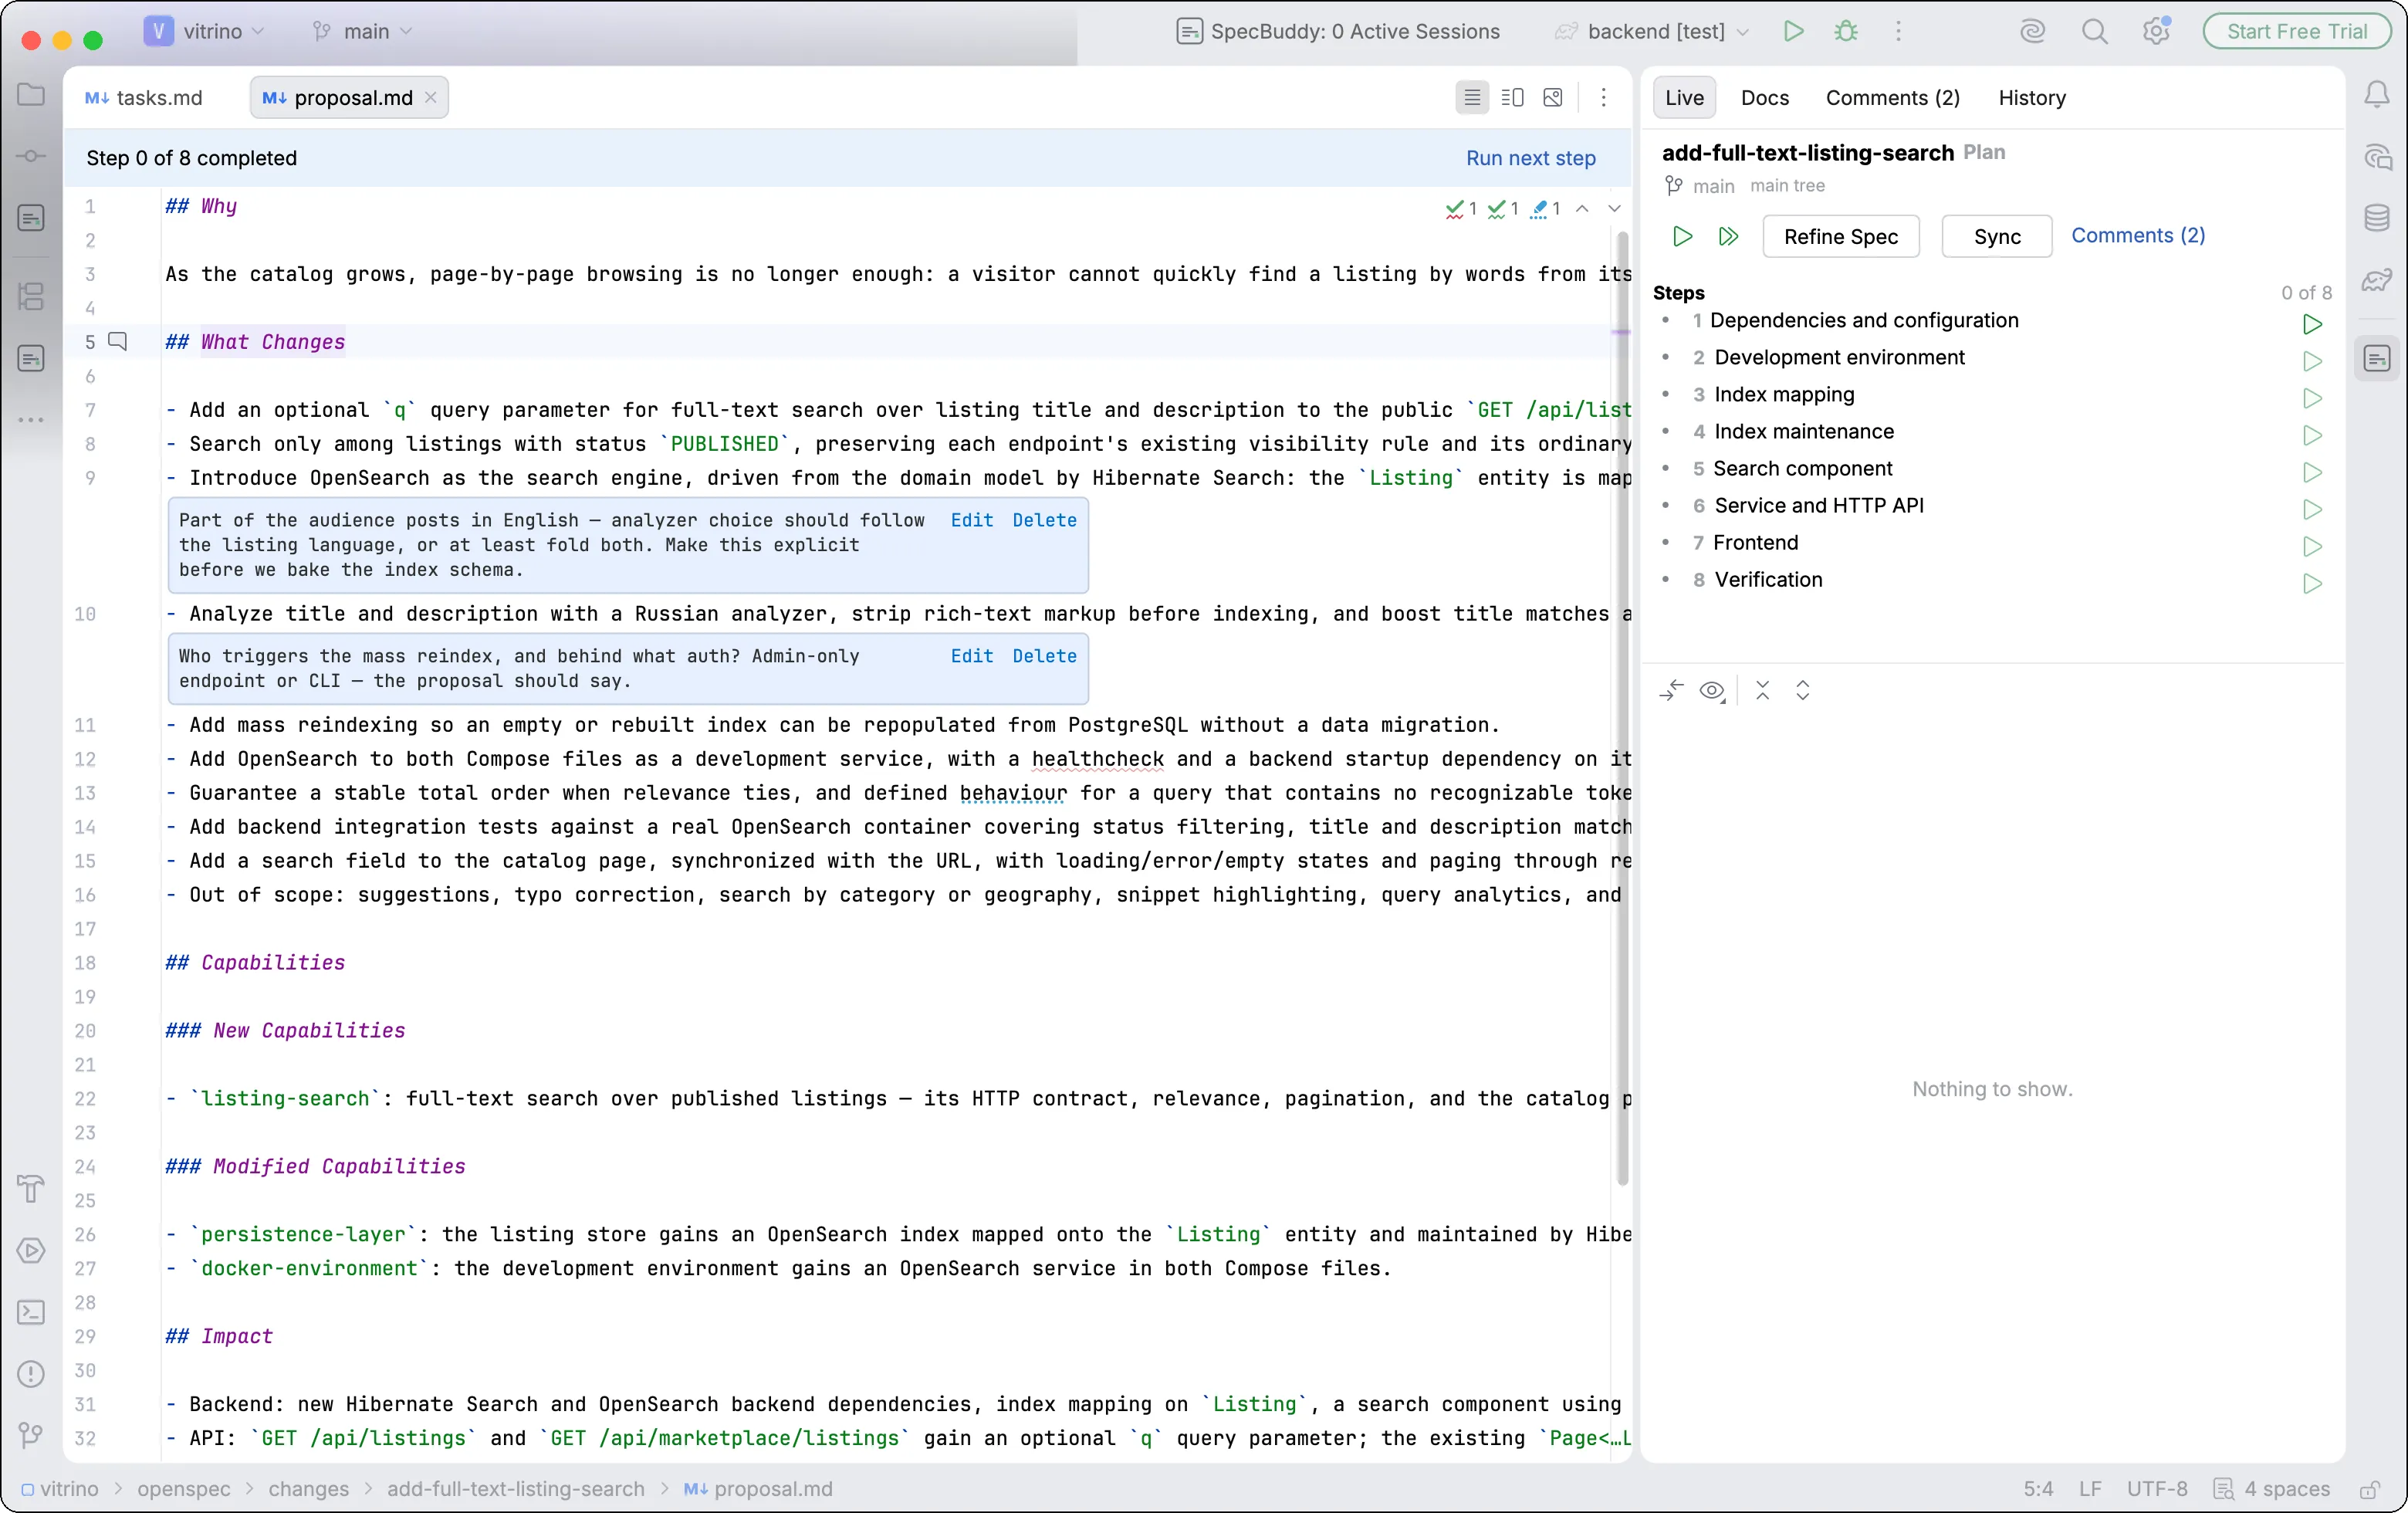
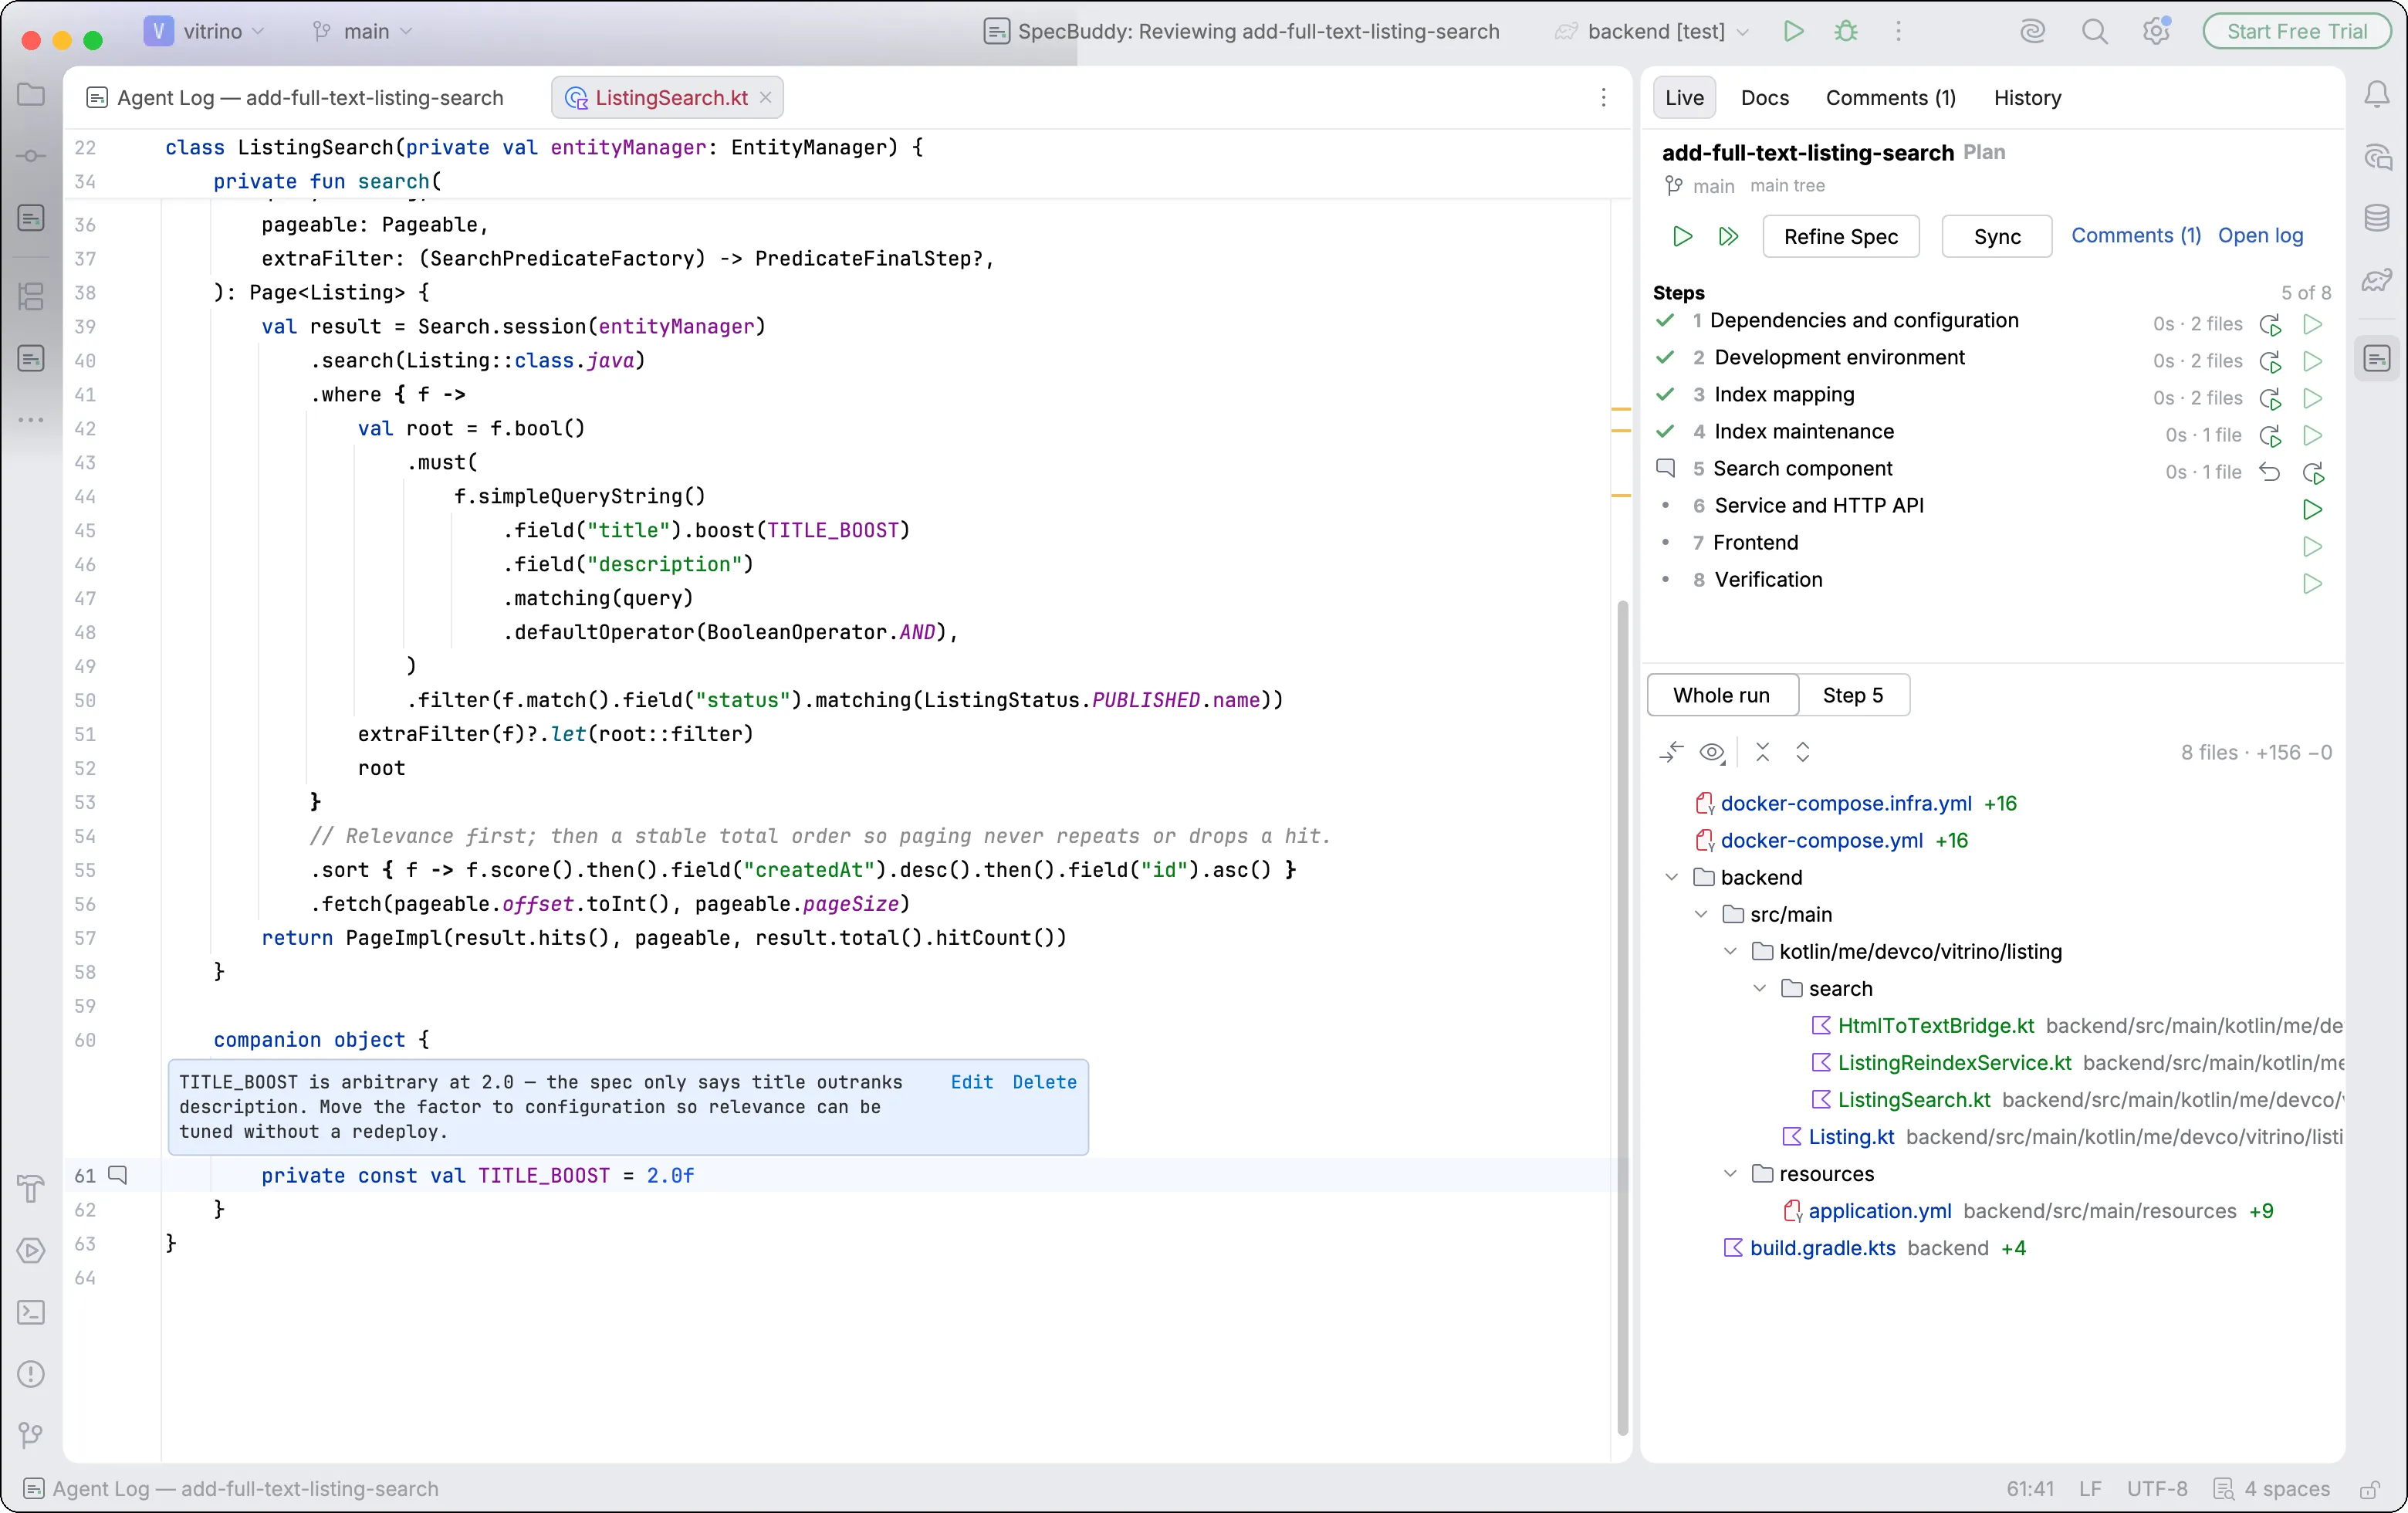
Next we call /opsx:apply. OpenSpec is supposed to fully execute every task in tasks.md, landing the changes in our code. And this is where OpenSpec leaves the developer alone with the agent. The tasks are supposed to get done somehow. But what happens after? What do we do if a task can’t be completed for some reason, or the result isn’t quite what we wanted?
What’s still missing is control inside the implementation. Code review between steps, with feedback handed back to the agent before it moves on. apply is still a single pass, and verify looks at the result once everything is already written.
Here I want to point to Anthropic’s article on unknown unknowns. The map is still not the territory, and until we’ve walked the territory we won’t have an accurate map. So applying a spec is always a risk. The risk that it turns out to be inapplicable, strange as that sounds. Or that it gets applied differently than we expected.
And this is where I can point to SpecBuddy again — a tool that adds something on top of OpenSpec. It lets you execute tasks one at a time, running a full code review along the way and handing feedback back to the agent. That’s an essential part of the lifecycle. As far as I’m concerned, a spec isn’t finished until we’ve implemented it.
OpenSpec sync and archive
Once we’ve applied a spec, the project’s behavior has obviously changed — and the main specs mentioned earlier need updating. OpenSpec has /opsx:sync and /opsx:archive for this. The difference: sync can be called at any point to partially fold the current change spec into the main specs. Useful when a feature is large and you don’t want the two spec states drifting too far apart. archive is called at the end: the change spec moves to openspec/changes/archive/<date>-<change>/, and its deltas are merged into main. That way the main specs always describe the system as it is right now, while the history — how we got here — is preserved separately and stays out of the way.
Essentially archive is the same as sync, plus moving the change into the archive and closing it. A standalone sync exists precisely for long changes, where you want the main specs kept current before the change is closed.
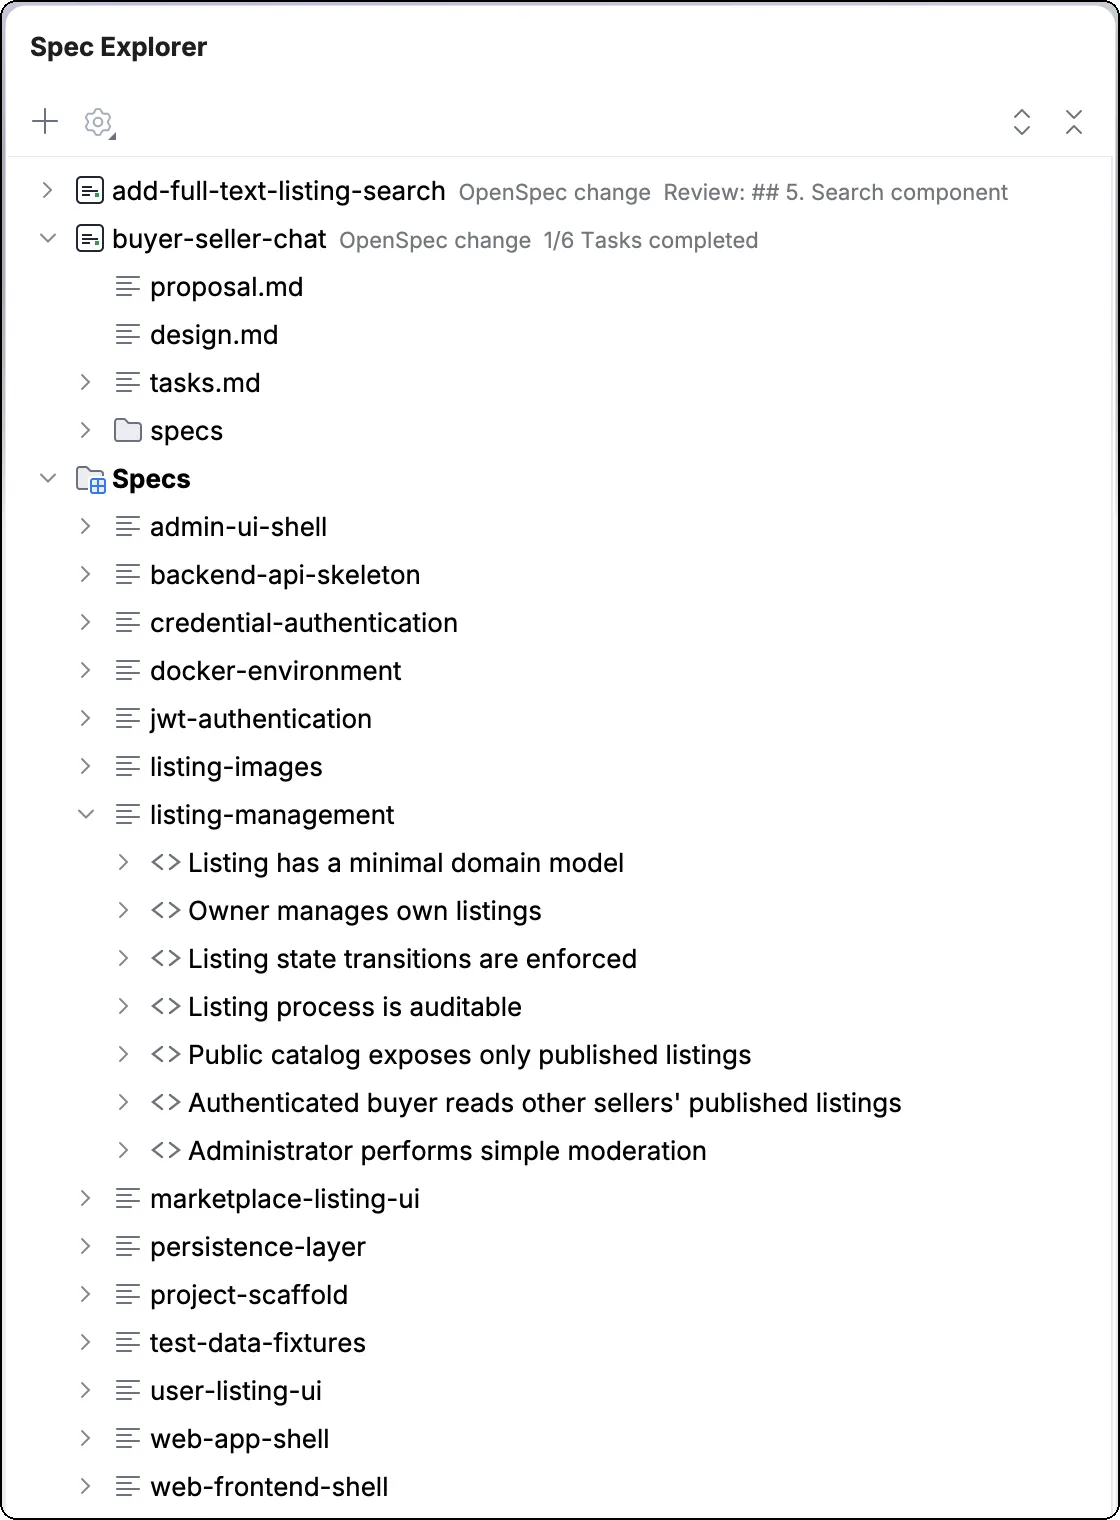 Project specifications displayed in the Spec Explorer.
OpenSpec explore
OpenSpec also has a straightforward explore skill. It creates no artifacts; it helps you study the project and decide where to extend it next. It’s a preparatory step before /opsx:propose. You can read the skill itself right here.
OpenSpec: extensibility
config.yaml
Now we can return to config.yaml. This file describes the important things about how OpenSpec should work with your workflow specifically: what data to always pull into context, what actions to perform in a given phase. For instance, you can specify that tests must be run after all tasks are complete (though that one’s fairly obvious anyway).
Really, there are two genuinely useful fields in config.yaml:
context— text that gets automatically pasted into every agent prompt. Your stack, conventions, project invariants. Write it once, and the agent stops guessing from scratch every time what language you’re on and whether it’s allowed to break the public API. Similar toAGENTS.md, but for OpenSpec.rules— rules per artifact type. For example: “specs are always in Gherkin,” “every proposal needs a rollback plan,” “every task needs an acceptance criterion.” A rule attaches only to its own artifact, and you don’t have to repeat it in every prompt. More on artifacts just below.
All of it is plain YAML in git: versioned alongside the code, shared with the whole team in a single commit, editable by hand in a minute. Cheap and useful.
By the way, don’t confuse config.yaml with another file, .openspec.yaml, which lives inside each change’s folder. That one you’ll almost never touch by hand — the CLI maintains it. It holds machine metadata: which schema the change uses and when it was created.
schema.yaml
“Artifacts” came up a couple of times above. So: artifacts are the parts of each specification — proposal.md, specs/, design.md, tasks.md. And that’s not the only possible, rigidly fixed format — OpenSpec lets you describe your own specification structure. It’s called a schema, and it’s simply a graph of artifacts: what gets generated, in what order, and what depends on what. The default schema lives here.
One caveat up front: the openspec schema subcommand is marked experimental in the CLI, so I wouldn’t rush to build a team process on top of it just yet.
Your own schema is a folder openspec/schemas/<name>/ with a schema.yaml file and a templates/ subfolder for artifact templates. The easiest path is to fork the default one (openspec schema fork spec-driven my-schema) and file it down. Say we want to add a separate testing-strategy artifact between design and tasks:
# Some of fields are missing for the sake of simplicity
name: my-schema
version: 1
description: standard openspec flow + a separate testing strategy
artifacts:
  - id: proposal
    generates: proposal.md
    template: proposal.md
    requires: []
  - id: specs
    generates: specs/**/*.md
    template: specs/spec.md
    requires: [proposal]
  - id: design
    generates: design.md
    template: design.md
    requires: [specs]
  - id: testing-strategy          # ← our new artifact
    generates: testing-strategy.md
    template: testing-strategy.md
    requires: [design]
  - id: tasks
    generates: tasks.md
    template: tasks.md
    requires: [design, testing-strategy]
apply:
  requires: [tasks]
  tracks: tasks.md
Order isn’t determined by position in the list but by the requires field — that’s the dependency graph. The schema is activated with a schema: my-schema line in config.yaml (or the --schema flag on a specific change). To check where a schema resolves from, use openspec schema which.
One more thing: if you’ve taken a liking to SpecBuddy, for now it’s advisable not to drop the tasks.md artifact from your schema — without it most of the functionality becomes unavailable.
OpenSpec: verdict
OpenSpec is a fairly lightweight tool for working from specifications. A simple command system, a comprehensible workflow. Where the specs live has been decided for us, while still leaving room to change their format. I really like that specs live next to the code, and that instead of walking over to Dave I can now find, right there in the commit, the change spec that led to those specific changes.
I’ll note separately that the team is moving in what I think is the right direction: update, continue, and verify amount to an admission that a change spec is a living document too, not a verdict. But apply itself is still a single pass: you can’t wedge yourself in between implementation steps, and in my experience that’s exactly where most of the unknowns surface. Tools like SpecBuddy let you modify the spec during execution — and for me that’s a fundamental part of the cycle.
Spec Kit
The second methodology is GitHub Spec Kit. Judging popularity by GitHub stars, it’s roughly twice as popular a tool.
Installation
It’s also installed as a CLI tool: uv tool install specify-cli, followed by project initialization — specify init <project> — which installs a set of slash commands under the speckit prefix. During initialization, a pile of things gets generated in the .specify directory: markdown templates for various documents and several shell scripts. It’s worth studying that directory in more detail if you want to adjust your standard workflow — in practice, the whole thing is configured through it. We won’t be calling into the CLI much from here either; we go straight to our agent.
A few words about those scripts so they don’t scare you: they’re deterministic and they do the mechanical work you can’t leave to an agent’s eyeballing. create-new-feature sets up a feature (branch, specs/<NNN-feature>/ folder, initial spec.md), setup-plan and setup-tasks prepare the plan and task skeletons, check-prerequisites verifies the previous artifact is in place (a plan requires a spec, tasks require a plan), and common holds shared helpers. They ship in three flavors (bash / PowerShell / Python) for cross-platform support. The slash commands invoke them for you.
The constitution
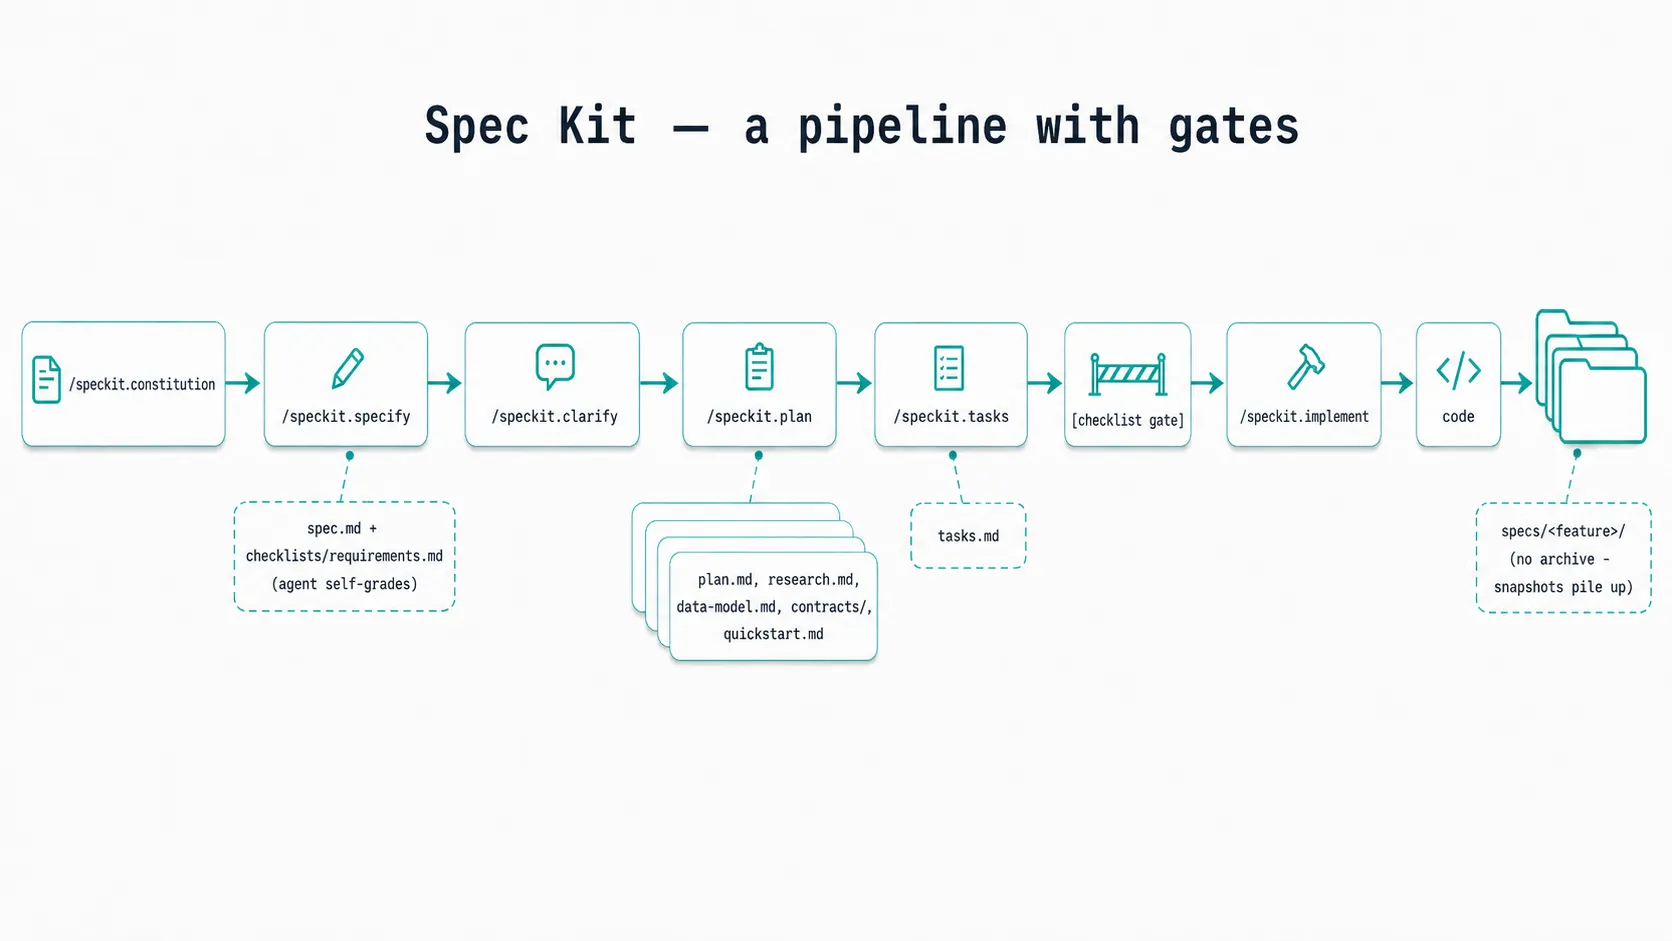
Work begins by defining a constitution. /speckit.constitution runs a short interview: what the project is, what principles to follow, what your stack is. The output is a fairly substantial document at .specify/memory/constitution.md. You can think of it as a kind of AGENTS.md too — context that Spec Kit will use in every subsequent phase.
Spec Kit specify
The next command is /speckit.specify. Broadly it resembles OpenSpec’s propose: we describe the task we want done. But in the standard Spec Kit workflow the spec structure is a little different. We get a spec.md file and a checklists/ directory, which — oddly enough — immediately gets populated with checklists that verify your spec against certain requirements about the specification itself. I know that sounds convoluted, sorry. The AI is literally checking the spec and writing a document with the results. This approach gives an extra layer of assurance that the spec comes out the way the authors of this workflow intended. More on checklists later.
Inside spec.md we’ll find several sections: User Scenarios & Testing (scenarios in Gherkin format), Requirements, Success Criteria, and possibly Assumptions (if we’re using the standard workflow).
SpecBuddy’s support for Spec Kit is weaker than for OpenSpec right now: you’ll have to invoke the commands through the agent yourself. Which is broadly fine. The review mechanism, though, is available to you. Specs are generated in the specs/ folder with a sequential feature number. You can use the familiar code-review mechanism to leave comments directly on the specification and ask the agent to address them in free form — it’ll pull in your comments and make the changes.
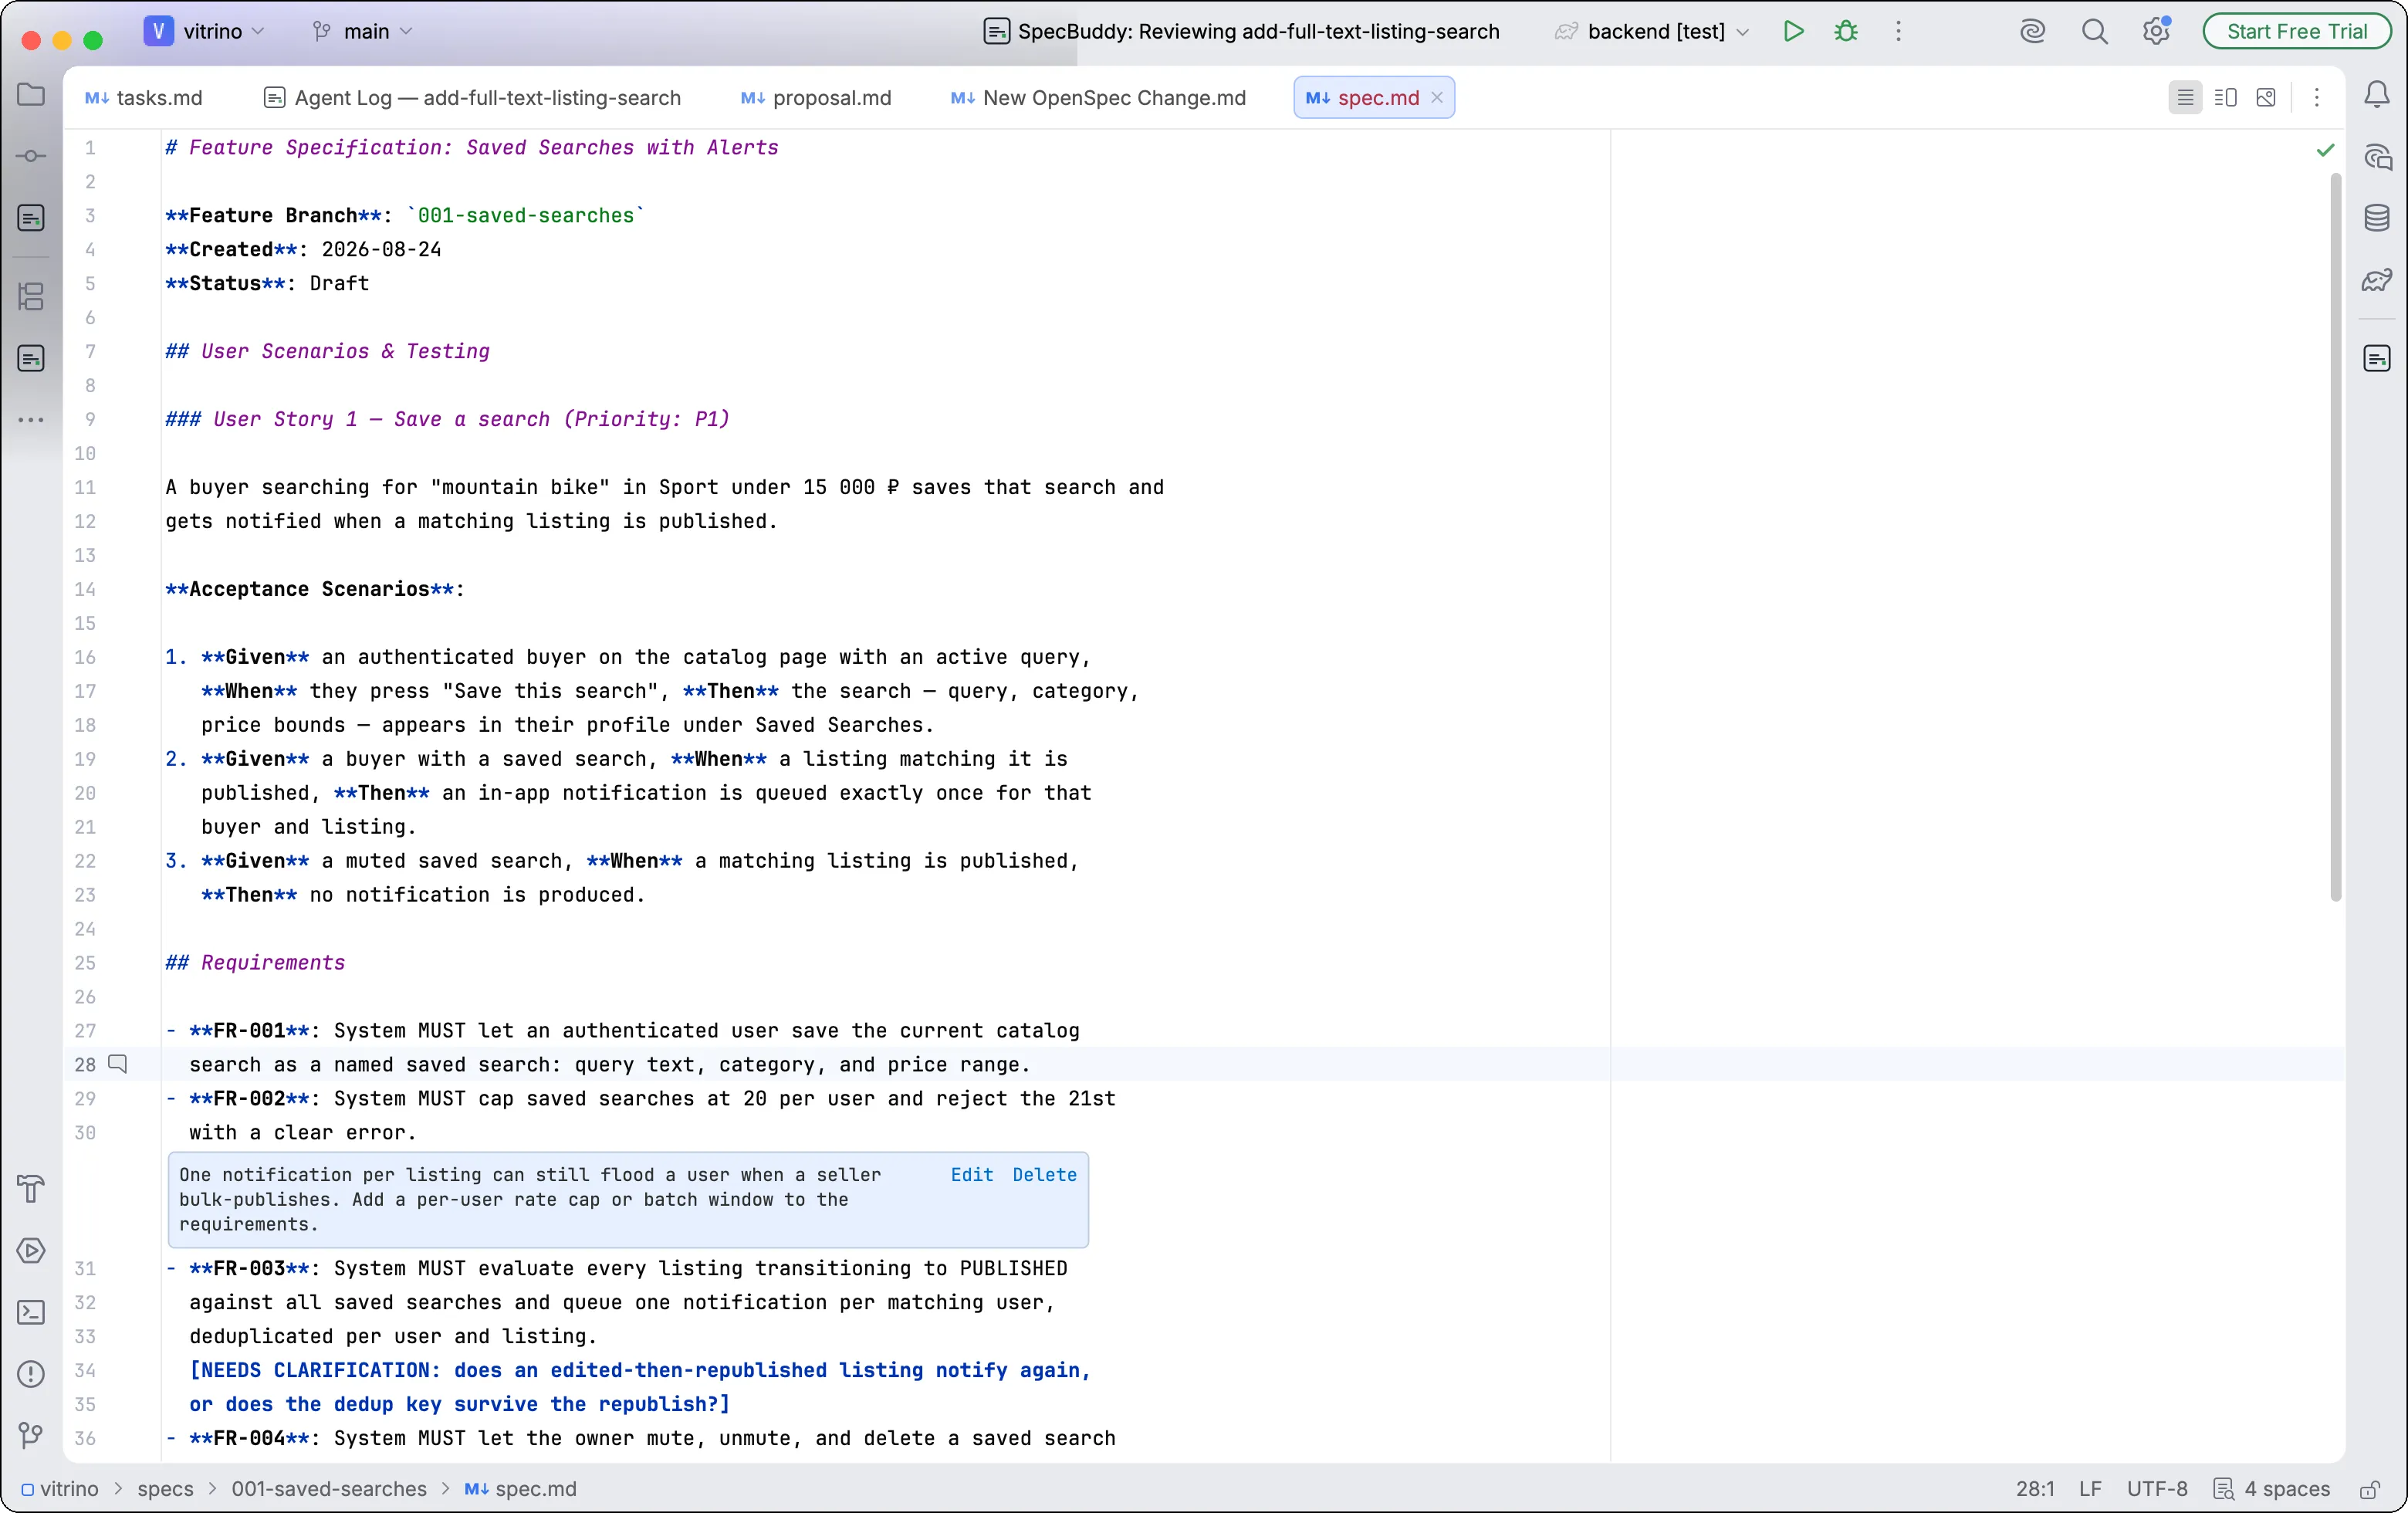
Of course, an agent creating a spec is no guarantee that the spec is correct. Spec Kit has a dedicated /speckit.clarify skill for challenging it: it’s tuned to find the places the spec doesn’t cover. Well — that’s certainly cheaper than leaving an agent to hammer out code overnight, so let’s not skip it.
Spec Kit plan
Once the spec has been reviewed and we’re confident it fully reflects our intent, the planning stage begins. /speckit.plan works in two phases and creates several artifacts at once. Phase one is research: it creates research.md, where the agent tries to close out the remaining open questions. Phase two is technical design documentation: the domain model, interface contracts (in a separate contracts/ folder), and even a quickstart.md for validating the feature.
But once more, note: it’s entirely in your power to tune this to your needs. The command’s behavior is described in .specify/templates/plan-template.md:
specs/[###-feature]/
├── plan.md              # This file (/speckit.plan command output)
├── research.md          # Phase 0 output (/speckit.plan command)
├── data-model.md        # Phase 1 output (/speckit.plan command)
├── quickstart.md        # Phase 1 output (/speckit.plan command)
├── contracts/           # Phase 1 output (/speckit.plan command)
└── tasks.md             # Phase 2 output (/speckit.tasks command — NOT created by /speckit.plan)
I won’t miss the chance to mention that SpecBuddy is a great fit for reviewing all of these documents and sending them back for revision.
Naturally, the main file in this whole pile is plan.md. But no, it doesn’t contain what you’re thinking. It’s not a task list; it’s more of a high-level implementation description with links to the other documents. I’d have called it design rather than plan. And if you looked carefully at the snippet above, you spotted tasks.md in there — which this command does not produce. Moving on.
Spec Kit tasks
/speckit.tasks breaks the plan into an ordered list of concrete tasks. That long-awaited tasks.md gets created, and the breakdown is quite detailed: several phases, each with its own subtasks, links back to User Stories, and markers for tasks that can be executed in parallel.
I have nothing to add here beyond a reminder about the map-and-territory metaphor.
Spec Kit implement
At last we get to writing code. /speckit.implement kicks off task execution. But before that, the checklists run — the ones I haven’t explained much yet. Let’s do this again, slowly: the checklists run before any code is written. When I first read about this functionality, I assumed these were checklists that verify the implementation. But no — these are checklists that verify the spec. We worked for a long time, generated a pile of files, and now we need to make sure that what we generated isn’t bullshit.
Here’s how it works under the hood. implement scans the entire checklists/ folder, counts checked and unchecked items in each file, and builds a PASS/FAIL table. If even one checklist is incomplete, the command stops and asks: “continue anyway? (yes/no)”. This is effectively the single human control point before the agent goes off to grind through all of tasks.md.
Checklists can be generated ahead of time with /speckit.checklist, specifying what exactly we want verified: ux, security, api — whatever you like. They all share one idea: they’re “unit tests for English.” That is, each item checks not the code but the quality of the requirements themselves: are they fully specified, unambiguous, measurable, free of contradictions? Not “check that the button is clickable,” but “does the spec actually define what happens if the logo image fails to load?”
A separate note about the checklists/requirements.md that appears on its own back at the specify step. There’s a catch: the agent ticks the boxes in it — it’s grading its own spec. So it’s still worth reading that file, but not as a certificate that everything is fine. Read it as the agent’s self-assessment report: look first at the unresolved items, and at which ambiguities it closed by deciding something on your behalf.
We do intend to build step-by-step execution for Spec Kit in SpecBuddy — but we haven’t yet. For now you’ll be reviewing the full diff.
Spec Kit: the life of a spec after implementation
One last question: where does a spec go in Spec Kit after we’ve implemented it? Nowhere. It stays exactly where it was, in specs/<feature>/. There’s no archiving mechanism, and no equivalent of OpenSpec’s main specs. Which means that six months from now, specs/ will hold a stack of per-feature snapshot folders, and there’s no way to assemble a single “how the system works today” document out of them.
Spec Kit: extensibility
This is where Spec Kit stands up to its full height. Where OpenSpec’s entire extensibility story is two files (config.yaml and a custom schema), Spec Kit’s is an ecosystem with catalogs, versions, and resolution priorities. Let’s go layer by layer — from “edited it by hand” to “installed it from the marketplace.”
Resolution priority
The simplest option is to go into .specify/templates/ and rewrite a template. It works, but when Spec Kit updates, your edits will conflict with upstream. So for local edits there’s a dedicated folder: .specify/templates/overrides/.
And this is the ordering worth memorizing, because everything downstream revolves around it. Spec Kit looks for a template top-down:
.specify/templates/overrides/— project-local edits.specify/presets/<id>/templates/— installed presets (in priority order).specify/extensions/<id>/templates/— templates provided by extensions.specify/templates/— core
Importantly, resolution happens at runtime, on every template lookup, rather than being merged once at install time. Disable a preset and the behavior immediately falls back to the layer below. To check what actually won, run specify preset resolve spec-template.
Extensions: new commands
An extension is a package that adds new commands to Spec Kit. The manifest lives in extension.yml and looks unremarkable:
extension:
  id: bug
  name: "Bug Triage Workflow"
  version: "1.0.0"
  description: "Assess, fix, and validate bug reports against the codebase"
requires:
  speckit_version: ">=0.9.0"
provides:
  commands:
    - name: speckit.bug.assess
      file: commands/speckit.bug.assess.md
      description: "Assess a bug report against the codebase"
    - name: speckit.bug.fix
      file: commands/speckit.bug.fix.md
      description: "Apply the remediation from a bug assessment"
    - name: speckit.bug.test
      file: commands/speckit.bug.test.md
      description: "Validate that a previously fixed bug is resolved"
It installs in one line — specify extension add bug — and /speckit.bug.assess, /speckit.bug.fix, and /speckit.bug.test show up in your agent. If you’re on a skills-based integration (Claude Code, Codex), the extension’s commands are automatically registered as skills, and on removal they’re automatically cleaned up.
A word about hooks. An extension can attach itself to a core command: the jira extension, for instance, hooks into /speckit.tasks, and after task generation the agent will offer — “create issues in Jira?” Not automatic, just an offer, but the groundwork is already done for you.
The official extension catalog currently holds four: agent-context (maintains CLAUDE.md and its equivalents), assess (working an idea through before SDD begins), bug (that bugfix flow), and git (branches, feature numbering, remote detection). The community catalog, meanwhile, holds 145. And it has literally everything: bdd, ears (requirements in EARS syntax), brownfield (stretching SDD over an existing codebase), ci-guard (a CI gate that blocks merges when code and spec have drifted), cost (tracking the money spent on tokens), checkpoint, confluence, azure-devops, Mermaid diagram generation, architecture reviews, and on and on.
An important detail: the community catalog is discovery only. You can find things, but specify extension add <name> will refuse to install until you explicitly add the catalog as trusted or install the package from a ZIP URL. The maintainers don’t review extension code — they only verify that the catalog entry is properly formatted. An honest and sensible position.
Presets: overriding behavior
Where extensions add new things, presets override existing ones: artifact templates and the commands themselves. There’s also a difference in when they apply — templates resolve at runtime, while commands are registered into the agent when the preset is installed.
Presets stack, with priority set by a number (lower means it wins):
specify preset add enterprise-safe --priority 10
specify preset add healthcare-compliance --priority 5   # overrides enterprise-safe
And here’s what I genuinely like: composition strategies. By default a preset replaces the template wholesale, but it doesn’t have to:
| Strategy | What it does |
|---|---|
replace (default) | Fully replaces the lower-layer template |
prepend | Inserts your text before the lower-layer template |
append | Inserts it after |
wrap | Your file contains a {CORE_TEMPLATE} placeholder, replaced by the lower layer |
So instead of forking the entire spec template, you can just append a section to it:
provides:
  templates:
    - type: "template"
      name: "spec-template"
      file: "templates/spec-addendum.md"
      strategy: "append"
And composition is recursive: a security preset using prepend plus a compliance preset using append yields “security header + core content + compliance footer.”
The official preset catalog holds two — lean (throw out the extras, keep “prompt → artifact”) and constitution-sync. The community catalog holds 29, and those aren’t about mechanics anymore, they’re about domains: test-first-governance, security-governance, isaqb-architecture-governance (arc42 and iSAQB with audit-ready evidence), jira (overrides taskstoissues to create Jira epics instead of GitHub issues), spec2cloud (spec → deploy to Azure). There’s screenwriting and fiction-book-writing — SDD for screenplays and novels, 34 commands from idea to submission. And there’s pirate, which rewrites all of Spec Kit’s output in pirate speak. Just so you appreciate the breadth of the space.
Workflows: orchestration
This one is probably the most interesting and the most underrated. Recall the base cycle: five to seven commands you type in one after another. workflow lets you describe that cycle as a YAML pipeline and run it with a single command. Here’s the bundled workflow that ships with the project, .specify/workflows/speckit/workflow.yml:
# Some fields omitted for brevity
workflow:
  id: "speckit"
  name: "Full SDD Cycle"
  description: "Runs specify → plan → tasks → implement with review gates"
inputs:
  spec:
    type: string
    required: true
    prompt: "Describe what you want to build"
steps:
  - id: specify
    command: speckit.specify
    input:
      args: "{{ inputs.spec }}"
  - id: review-spec
    type: gate
    message: "Review the generated spec before planning."
    options: [approve, reject]
    on_reject: abort
  - id: plan
    command: speckit.plan
    input:
      args: "{{ inputs.spec }}"
  # ... review-plan, tasks, implement
You run it like this: specify workflow run speckit --input spec="...". Hit a gate and the runtime stops and waits for a human; specify workflow status shows where you’re standing, and specify workflow resume <run_id> continues.
There are eleven step types, and among them are honest control-flow constructs: if/then/else, switch, while, do-while, fan-out/fan-in (spread tasks across parallel agents with max_concurrency and then collect the results), shell (run a command and capture its output), prompt (send an arbitrary prompt with no command file at all), and gate (a human control point). Plus a templating layer with access to inputs, previous steps’ outputs, and runtime context like the run id and a scratch directory.
Effectively, there’s a small workflow automation engine living inside Spec Kit. The official catalog has one workflow — the base one; the community catalog has two: pipeline (the whole cycle including clarify, analyze, and converge) and yolo (the same thing without the gates — the name says it all).
It’s a genuinely interesting capability, but of course it raises a question: wouldn’t a plain script in js/ts have beaten inventing a DSL for this?
So do we actually need all this?
The machinery is powerful and, importantly, well thought out: priorities, composition strategies, runtime resolution, clean uninstalls. This isn’t “hooks thrown in wherever” — it’s a designed extension system.
But it has a price. First, sheer volume: to use it deliberately you have to hold four primitives, their catalogs, priorities, and resolution order in your head. Second, .specify goes from “a folder with templates” to configuration that itself needs reviewing and versioning — and you’ll be working out why a colleague’s spec generated differently from yours (spoiler: they have a different preset stack). Third, nobody audits the community catalog, and an extension is code and prompts that will be driving your agent.
I think the honest dividing line is this. If you’re a single developer or a small team, you’ll almost certainly be fine editing templates in .specify/templates/ and maybe adding lean. But if you have twenty teams, regulatory requirements, and a mandate that every spec in the organization look the same — then presets with priorities and your own corporate catalog stop looking like over-engineering and start looking like exactly what you need. OpenSpec currently has no answer for that request at all.
Spec Kit: verdict
Well — to my taste, the standard workflow is fairly complex and counterintuitive in places. Those very checklists that turn out to be unit tests for the spec. Or plan, which doesn’t quite produce a plan (I’d sooner call it design). I don’t think things like that do Spec Kit any favors. On the other hand, Spec Kit has markedly more room for customization. But do we need it?
So which one should you pick?
The two methodologies are fairly similar and have a lot in common — which is no surprise. The core idea is the same: plan first, then execute. Both describe requirements in Gherkin in their base workflow, and so on. Both have extension capabilities. That said, OpenSpec — for all its outward simplicity — has genuinely useful sync and archive steps that let you maintain a specification describing the system’s behavior as of right now. You could of course implement a similar mechanism in Spec Kit yourself, but the question is: will we want to? How much effort will it take, when you could simply pick up OpenSpec?
Personally I like OpenSpec more: on one hand its workflow feels more complete to me, on the other it feels simpler. That’s exactly why we supported it before GitHub Spec Kit — despite the latter having more GitHub stars.
But GitHub Spec Kit has its own advantages too. For example, a larger number of internal gates that won’t let you move to the next step. In today’s world that’s genuinely valuable.
Weighing the pros and cons of both methodologies, I think both essentially leave you alone with the agent during implementation and don’t answer the question very well: what do you do if the implementation goes sideways? Or, more precisely: what do you do when new circumstances come to light during implementation? That’s part of why I decided to build SpecBuddy.
Side-by-side comparison
If you want all of the above on a single screen:
| OpenSpec | Spec Kit | |
|---|---|---|
| Installation | npm i -g @fission-ai/openspec | uv tool install specify-cli |
| Command prefix | /opsx:* | /speckit.* |
| Base cycle | propose → apply → sync → archive | constitution → specify → plan → tasks → implement |
| Where specs live | openspec/changes/<change>/ in progress, openspec/specs/ for main | specs/<NNN-feature>/ |
| Artifacts | proposal.md, specs/, design.md, tasks.md | spec.md, plan.md, research.md, data-model.md, contracts/, quickstart.md, tasks.md, checklists/ |
| Requirements format | Gherkin | Gherkin + Success Criteria |
| Project-wide context | openspec/config.yaml → context, rules | .specify/memory/constitution.md |
| Gates | none before code; /opsx:verify checks the implementation before archiving | checklists with a PASS/FAIL table and confirmation — before code |
| ”How the system works today” spec | yes, main specs | no |
| Archiving a completed change | /opsx:archive | not provided |
| Customization | custom schema: artifact graph in schema.yaml + config.yaml | templates, overrides/, presets with a priority stack |
| Extension ecosystem | none | extensions (new commands), presets, workflow orchestration, bundles — all via catalogs, your own and community |
| Agent support | 33 tools | 37 integrations, plus scaffold for your own |
| Barrier to entry | low | noticeably higher |
| Step-by-step execution with review in SpecBuddy | yes | not yet, you review the full diff |
SpecBuddy is a free JetBrains plugin that turns your IDE into a cockpit for your agent: write the spec, review the plan, control every step — on top of the same Claude Code, Codex, or OpenCode you’re already using. Grab it from the JetBrains Marketplace.